

Step 1: The Browser Understands Your Request
The moment you press Enter, your browser doesn't immediately contact a server.
Instead, it first analyzes the URL you've entered.
https://byteandbites.com/blog/mvc
The browser separates it into different parts:
- Protocol → https
- Domain → byteandbites.com
- Path → /blog/mvc
Each piece determines how the request should be handled.
Before reaching out to the internet, the browser checks whether it already has the required resources locally. Modern browsers maintain several caches including memory cache, disk cache, and Service Worker cache, to avoid unnecessary network requests. If a valid cached copy exists, the browser can often skip multiple steps and load the page significantly faster.
This local-first approach is one of the biggest reasons frequently visited websites feel almost instantaneous.
In other articles, we'll explore browser caching, cache invalidation, and Service Workers in depth.
Step 2: DNS Finds the Server
Computers don't understand domain names like:
google.com
They communicate using IP addresses such as:
142.250.183.14
The Domain Name System (DNS) acts as the internet's phone book, translating human-friendly domain names into machine-readable IP addresses.
Before querying the global DNS infrastructure, your browser first checks its own cache, followed by the operating system's DNS cache. Only if the address isn't found locally does it contact a recursive DNS resolver, which may query root servers, top-level domain (TLD) servers, and authoritative name servers until it finds the correct IP.
Although this process sounds lengthy, it usually completes in just a few milliseconds and thanks to caching, repeat visits are often even faster.
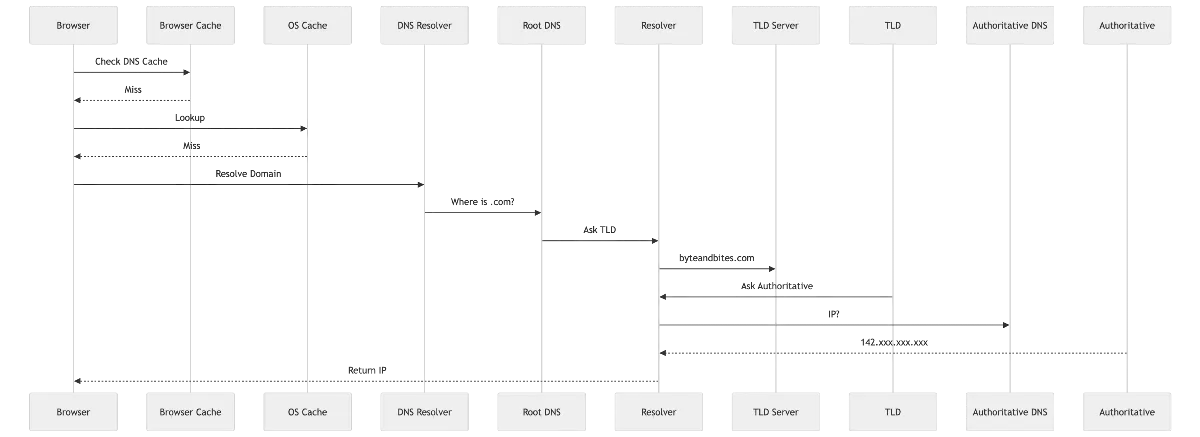
We'll dedicate an entire article to DNS resolution later in this series.
Step 3 — Establishing a Reliable Connection (TCP)
Now that the browser knows where to send the request, it needs a reliable communication channel.
The internet is inherently unreliable as packets can be delayed, duplicated, or lost along the way. TCP (Transmission Control Protocol) solves this by ensuring data is delivered in the correct order and retransmitted if anything goes missing.
Before any application data is exchanged, the client and server perform a three-way handshake to establish a reliable connection.
- Client → SYN
- Server → SYN-ACK
- Client → ACK
Only after this handshake completes can the browser begin sending HTTP requests.
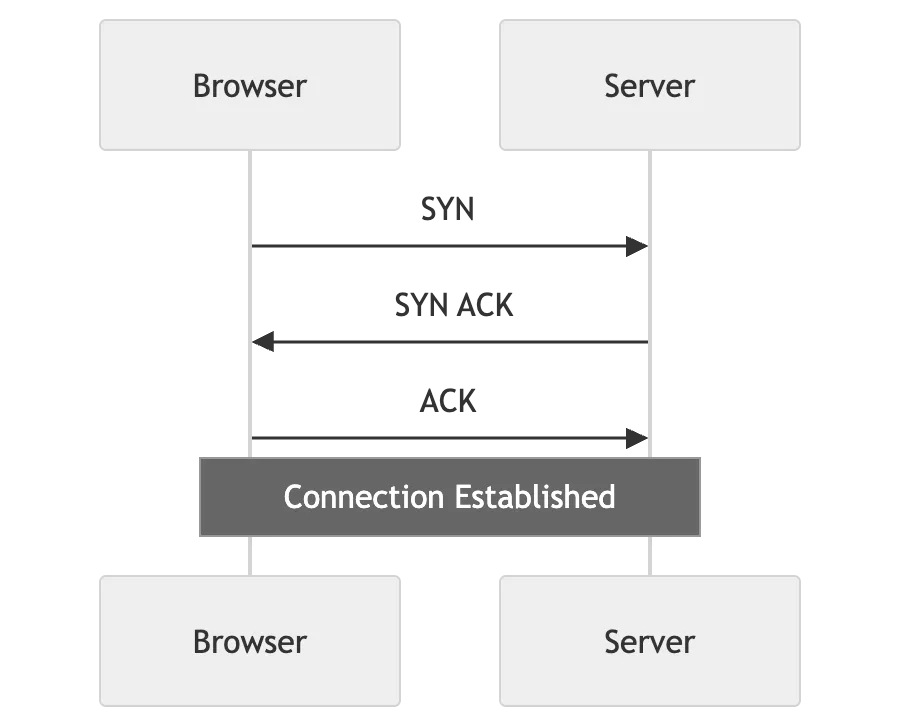
Think of it like making a phone call: you first establish that both parties are connected before starting the conversation.
Step 4: Securing the Connection (TLS)
Imagine sending your banking password as plain text across the internet.
Anyone intercepting the traffic could read it.
That's why modern websites use HTTPS, which relies on TLS (Transport Layer Security) to encrypt communication.
During the TLS handshake, the browser verifies the website's digital certificate, negotiates encryption algorithms, and securely establishes a shared session key. Once this process is complete, all subsequent communication is encrypted, protecting it from eavesdropping and tampering.
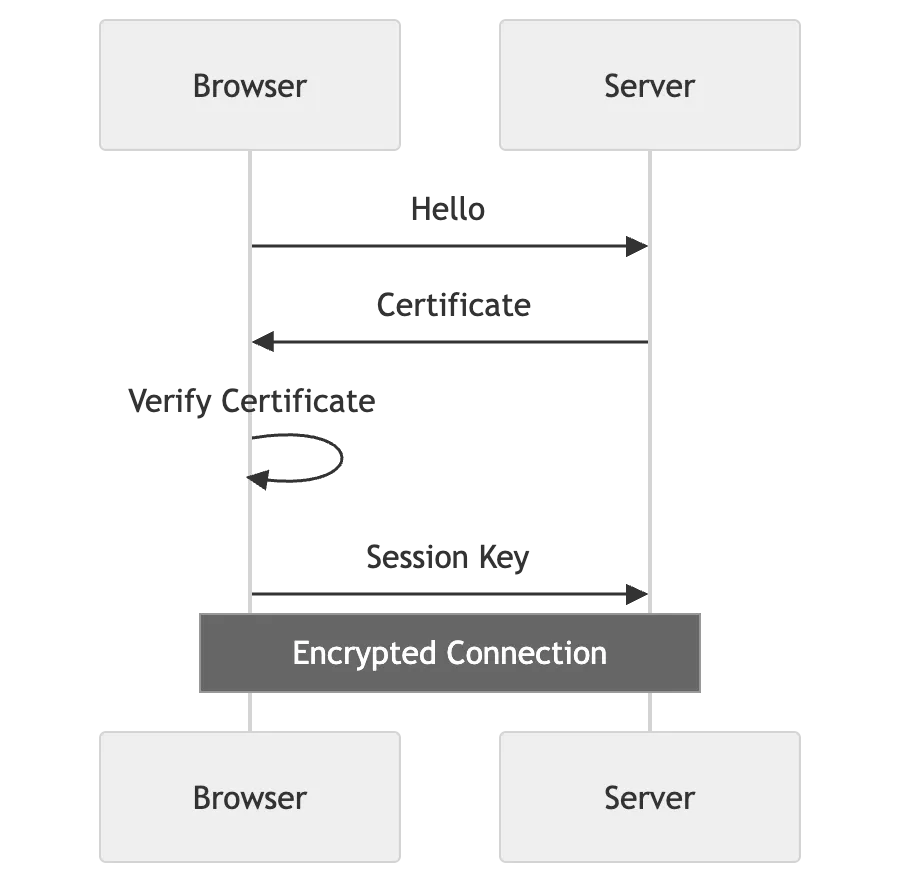
This is what gives us the familiar 🔒 lock icon in your browser.
Step 5: Sending the HTTP Request
With a secure connection established, the browser finally sends the actual request.
A typical request contains much more than just the URL.
It includes:
- HTTP method (GET, POST, PUT, DELETE)
- Request headers
- Cookies
- Authentication tokens
- Accepted compression formats
- Preferred language
GET /blog/mvc HTTP/1.1
Host: byteandbites.com
Accept: text/html
Cookie: session=*****
User-Agent: Chrome
These details help the server understand what you're requesting and how you'd like the response to be delivered.
Step 6: CDN (Content Delivery Network)
Not every request travels all the way to the application's origin server.
Static assets such as images, stylesheets, JavaScript files, and videos are often served from a Content Delivery Network (CDN).
A CDN stores copies of content across edge servers located around the world. When you request a resource, you're typically served by the nearest edge location, reducing latency and improving performance.
Instead of downloading an image from a server thousands of kilometers away, you receive it from a nearby data center reducing load times by hundreds of milliseconds.
Step 7: Load Balancer
Large applications rarely run on a single server.
Instead, requests first reach a load balancer, which distributes incoming traffic across multiple application servers.
This ensures that no single server becomes overwhelmed and allows the system to remain available even if one server fails.
Without load balancing, popular applications would quickly become bottlenecked during traffic spikes.
Step 8: Application Server
The application server is where your business logic lives.
For example, when requesting a product page, the server may:
- Authenticate the user
- Check permissions
- Query cached data
- Fetch additional records from the database
- Apply business rules
- Generate the final response
This is where the application actually "does work."
Step 9: Cache & Database
Before querying the database, many applications first check an in-memory cache like Redis.
If the requested data is already cached, it can be returned almost instantly, avoiding an expensive database query.
Only when the cache doesn't contain the data does the application fall back to the database.
This cache-first strategy dramatically improves response times for frequently accessed content.
Step 10: Browser Rendering
Receiving HTML is only half the story.
The browser still needs to transform raw HTML, CSS, and JavaScript into the webpage you see on your screen.
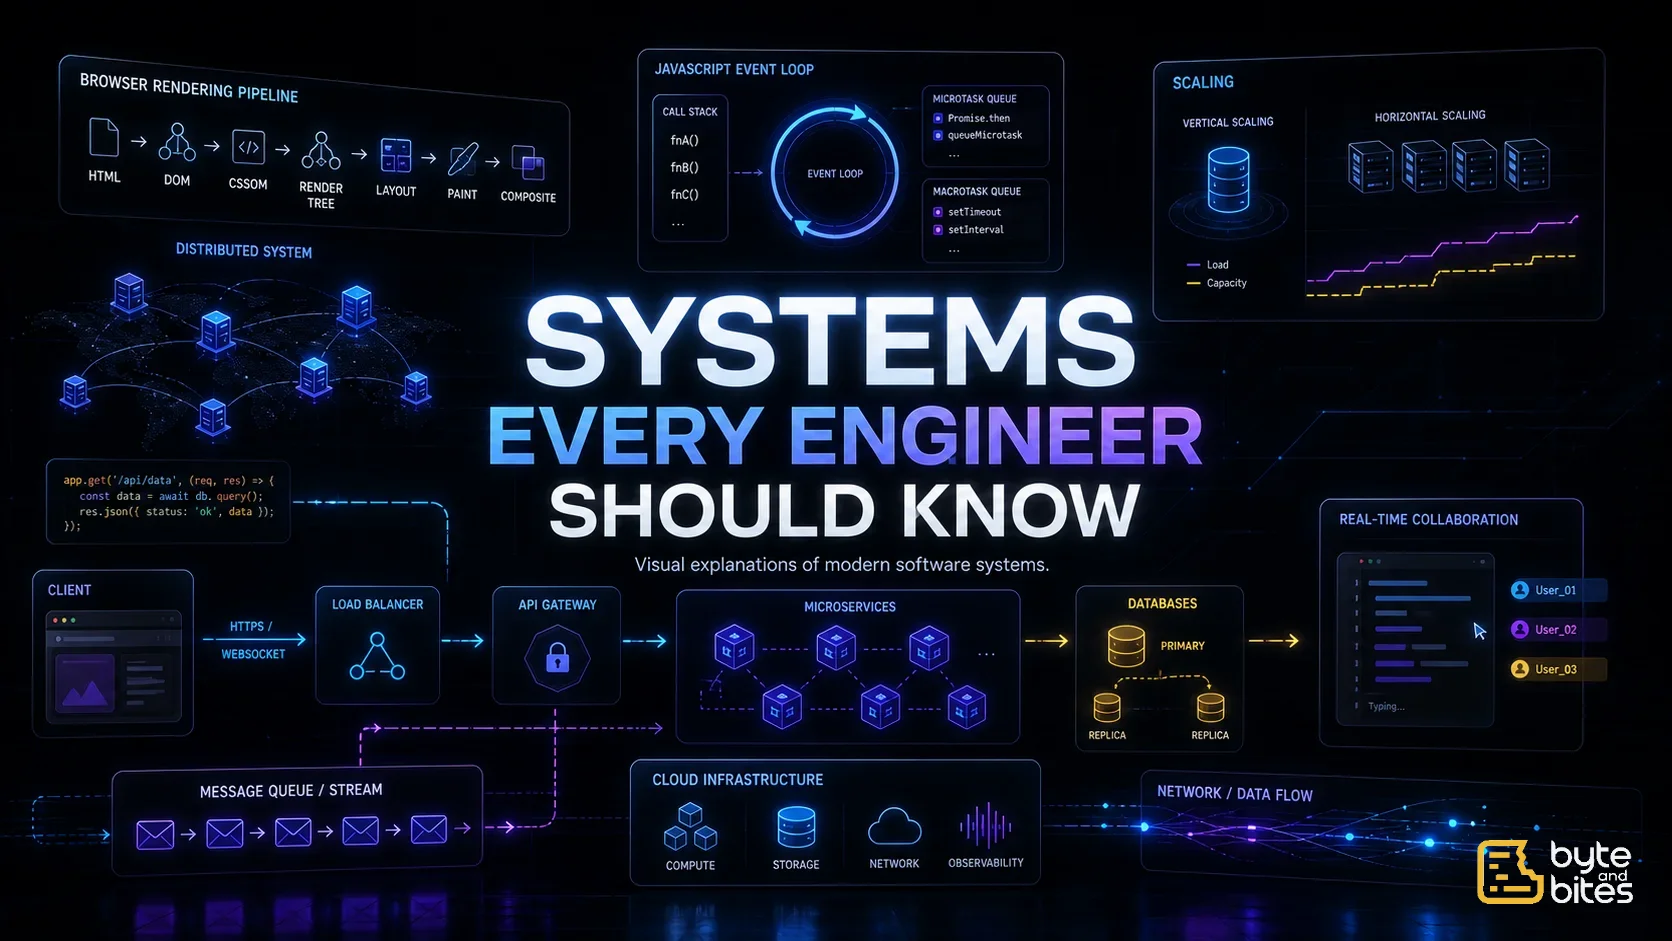
It parses the HTML into a DOM tree, processes CSS into a CSSOM, combines them into a render tree, calculates layout, paints pixels, and finally composites everything together for display.
Although this entire pipeline often completes in milliseconds, it's one of the most performance-critical parts of the modern web.
Type URL
↓
Browser
↓
Cache
↓
DNS
↓
TCP
↓
TLS
↓
HTTP
↓
CDN
↓
Load Balancer
↓
Application Server
↓
Redis
↓
Database
↓
Response
↓
Browser Rendering
↓
Webpage 🎉
Conclusion
Loading a webpage is far more than a simple request. It’s a coordinated journey through browsers, networking protocols, servers, caches, and rendering engines. Understanding each step gives you a stronger foundation for building faster, more reliable, and scalable applications. In the upcoming articles of this series, we'll dive deeper into each stage and uncover the engineering concepts that power the modern web.